| STEP 1 | STEP 2 | STEP 3 |
| → How to open account with GoToNative? | → How To Add Your Blog/Site Address To GTN? | → How To Display GTN Ads On Your Site? |
Once you’ve added your site in the previous STEP 2 and waited for it to be approved by our moderators, it’s time to add small code to your site. A purpose of that code is to display GTN Ads so you can earn.
We give you ready-made program code (“Ad Units”), which you just need to insert on your blog exactly where you would like the ads to appear.
You can also generate multiple codes for the same site.
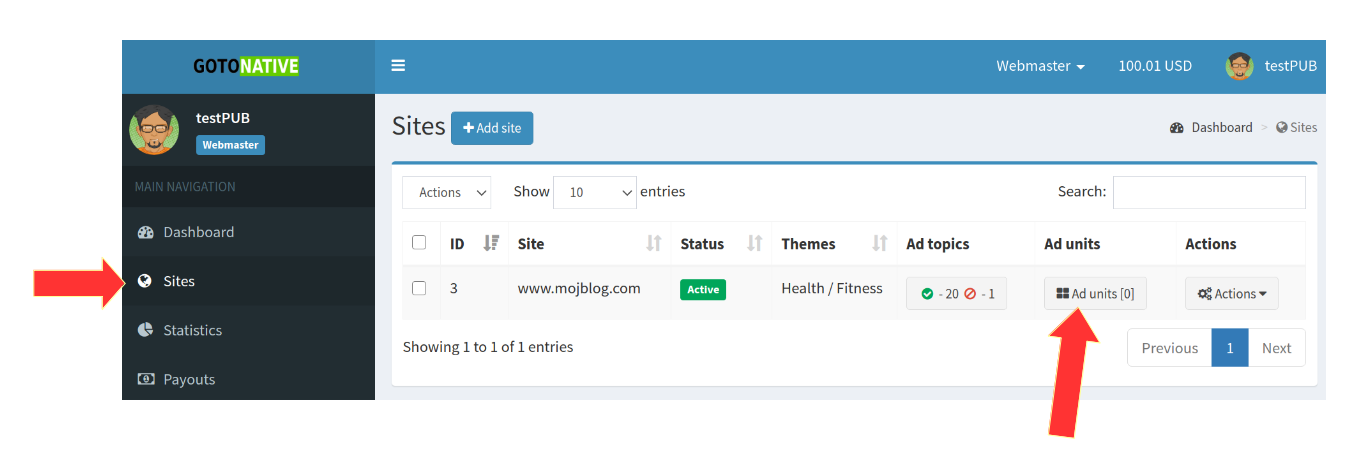
Log in to your GoToNative account. Switch to the “webmaster” platform. From the left menu, select SITES and right from the site click on AD UNITS
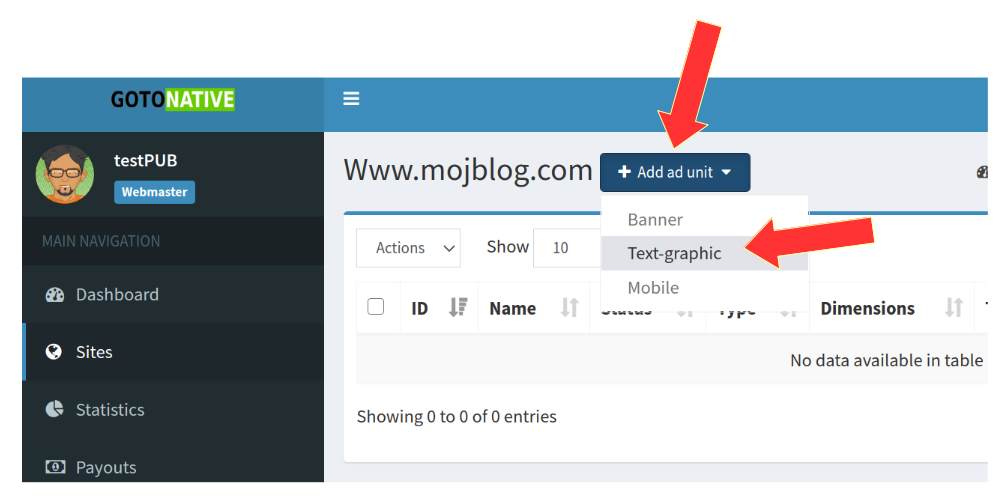
Click on ADD AD UNIT and select TEXT-GRAPHICS as this is the name for NATIVE ads. Do not choose banners or mobile ads. Most of our advertisers provide TEXT-GRAPHICS ads, so you’ll earn the most with TEXT-GRAPHICS type of Ads (“native ads”).
In the next window, you will get the ready-made AdUnit “code”. Everything is already prepared for you, you can just click on SAVE. But we will clarify a few options that you have here.
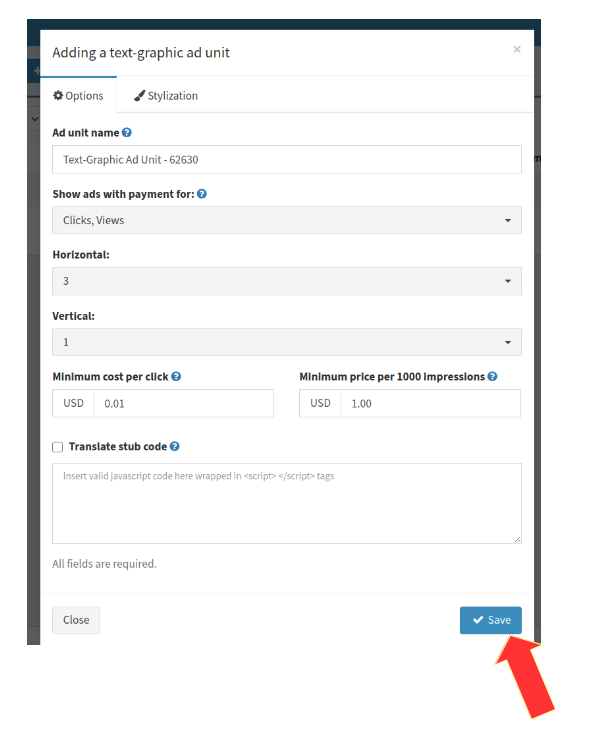
You can give the name of the AD UNIT. That NAME will not be displayed anywhere publicly, it is used only internally for your convenience to distinguish AD UNITs, if you have more than one. You can leave the name automatically assigned by the system if you don’t want to change it.
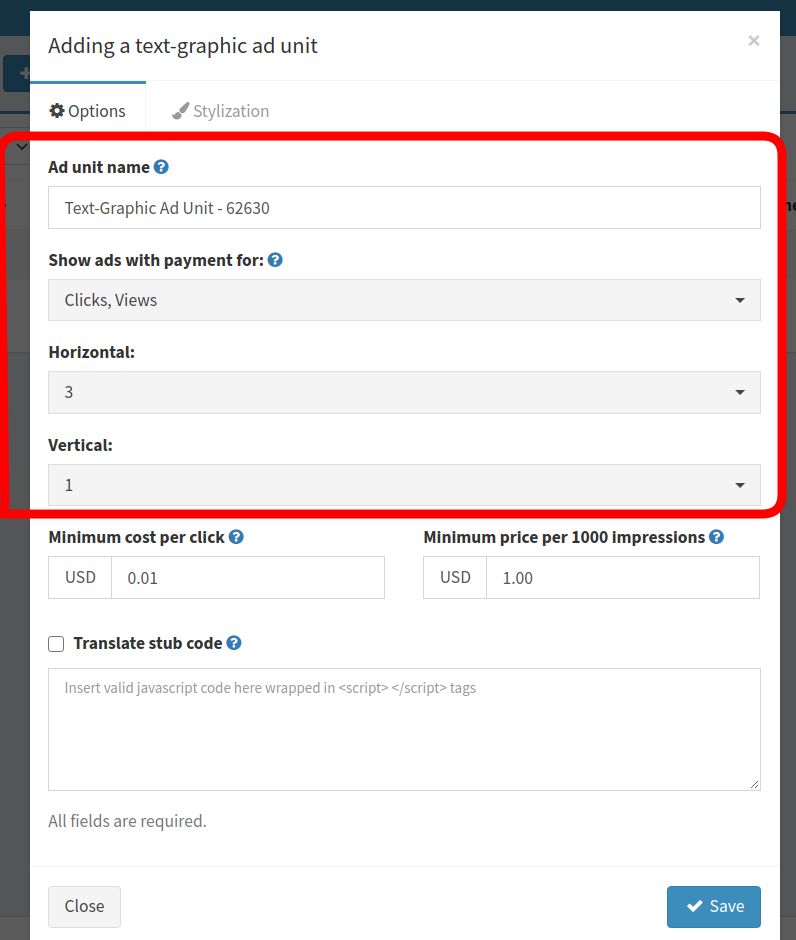
You can also set whether you want to show Ads by advertisers who pay “per-click” ( CPC ) or pay “per-view” ( CPM ), or both. The default option is both. CPM i.e. pay-per-view advertising is no longer popular among advertisers due to possible abuse, so most advertisers use per-click advertising where they are paying the set price ( CPC – Cost Per Click ) for each click on their ad displayed on your blog. This generates revenue for GoToNative which our platform then shares with you. We suggest leaving the default option “Clicks / Views”, which means both models.
The next step is to choose how many Ads you want to be shown within that AD UNIT on your blog. You can change that anytime you wish. How many ads and in how many rows and columns you want to be shown in that AdBlock ( “AdUnit” ). For example, if you want to display 3 ads in a row, choose Horizontal 3 and Vertical 1. Feel free to experiment. Of course, how a block of ads will appear to a visitor of your blog also depends on the screen resolution of the device from which visitor read your site ( mobile, desktop, tablet). It’s not the same if they read your blog using mobile device with a small screen, or a desktop PC with a large monitor. But you don’t have to worry too much about that – GTN AdUnits are fully responsive, so they will automatically adopt to the reader’s screen size and properly display GTN ads to them.
As for the cost of a click, you can determine the minimum cost-per-click or the minimum cost per 1000 impressions. That means the following. If, for example, you change from 0.01 to 0.02 under Minimum Cost per click, then your blog will only display ads from advertisers who want to pay $ 0.02 (2 dollar cents) or more, per each click. While this may sound like a great idea for web publishers to earn more, it is not always the case. Our experience is that if the cost of a click is too high, advertisers spend much less. That means less revenue for GoToNative, and as GoToNative shares revenue with publishers, you as our publisher, end up earning less. Therefore, we suggest that you leave the prices as already suggested. You can always experiment later. Of course, we have price list for our advertisers, but it is up to them to try with different prices, starting from $0.01 per click.
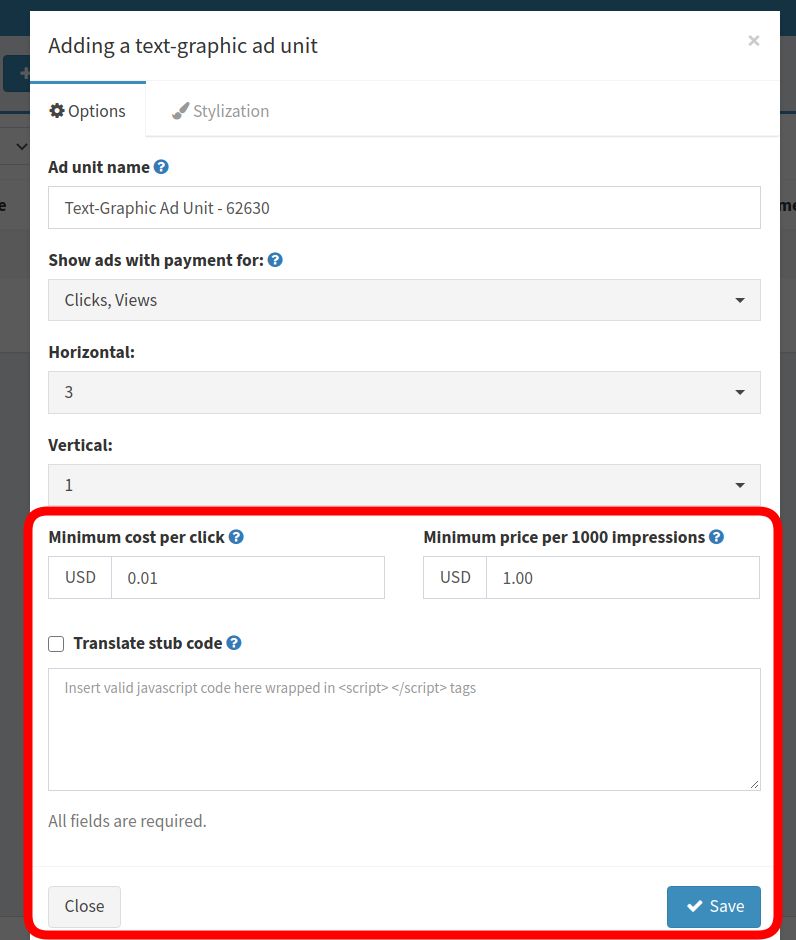
Of course if you leave a click price of $ 0.01 you will also earn from clicks from advertisers who are willing to pay more… so this only increases your earnings.
The last option, Translate stub code, might be useful in case GoToNative doesn’t have enough ads in its system for your parameters, in which case alternative Ads will be displayed. For example, your Google Adsense. This is also not necessary, because GoToNative has enough ads at all times.
As you can see, you could just click on SAVE right away without much thinking – everything is already set!
After clicking SAVE, close the window by clicking CLOSE. A menu to copy the program code (AD UNIT CODE) will appear.
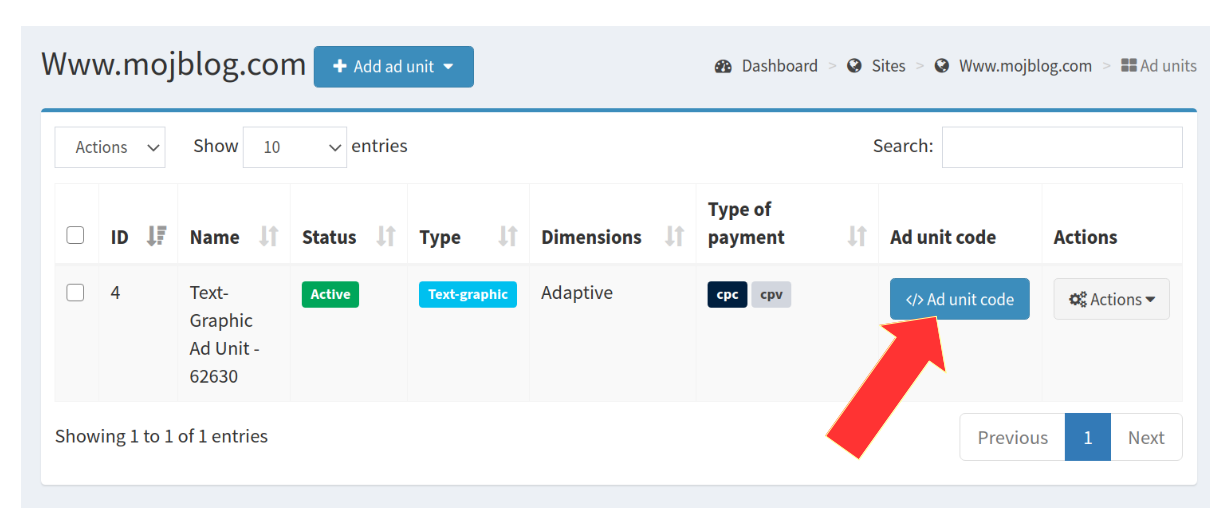
Click AD UNIT CODE. To copy the ad unit code, click on green COPY CODE TO CLIPBOARD button
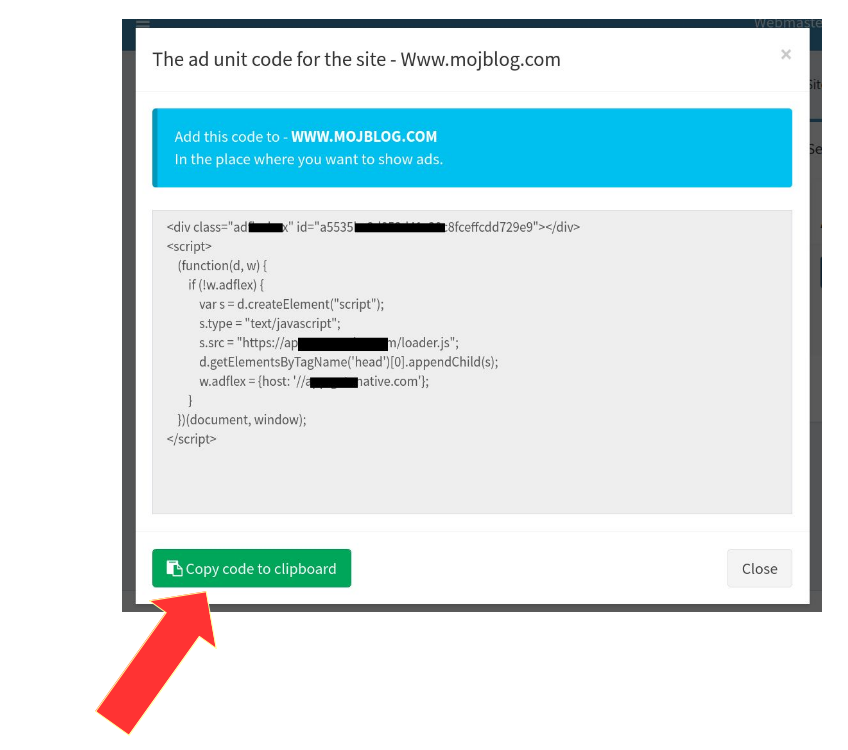
To copy the ad unit code, click on green COPY CODE TO CLIPBOARD button
You can save the short code in a text editor to your PC for a later use.
Simply PASTE that short code into your blog wherever you want GoToNative ads to appear. Ads are going to show automatically every time someone visit your blog
All blogging platforms have the option to insert program code into your post text, “insert code”, <code> </code>, “text editor” on WordPress and the similar option.
If you use WordPress there is a great free plugin for WordPress called Ad Inserter. It will make your life easier, because you don’t have to insert Ad Block code manually into every new post you write. Ad Inserter will do that automatically for you. It also has a wide range of possible settings. If you are interested in how to install and use the Ad Inserter plugin for WordPress, check this out:
Once you’ve pasted the program code to display GoToNative Ads on your blog, and saved the changes, you can open your blog in a new tab and see if the ads are displaying. Of course, your site must previously been approved , status ACTIVE, in the GoToNative system, as we explained in the previous STEP 2 – How to enter the address of your blog? And of course, if you listen to us about the price of a click, there will be a lot of cool Ads. Now you can relax, keep doing what you like the most – creating interesting content for your blog readers and bringing visitors to your blog, while money from GTN keep coming.
YOU CAN CHANGE HOW ADS WILL LOOK LIKE
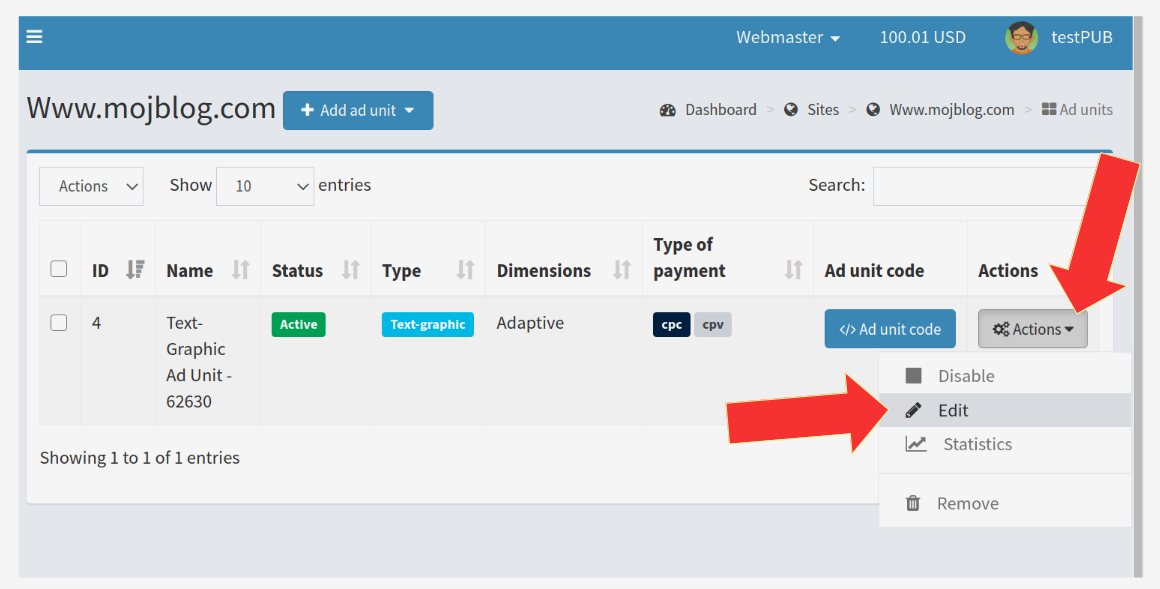
Default style is really nice and fits most blogs. However if you want to tweak the style, you can do so – easy way, via the STYLIZATION TAB within the AD BLOCK EDITOR. Click on ACTIONS and choose EDIT
To the right of AdBlock, select ACTIONS, then EDIT and then the STYLIZATION TAB.
You can change various graphic elements of the selected Ad block, such as the text font below the image, the background color, the frame color of the Ad block.
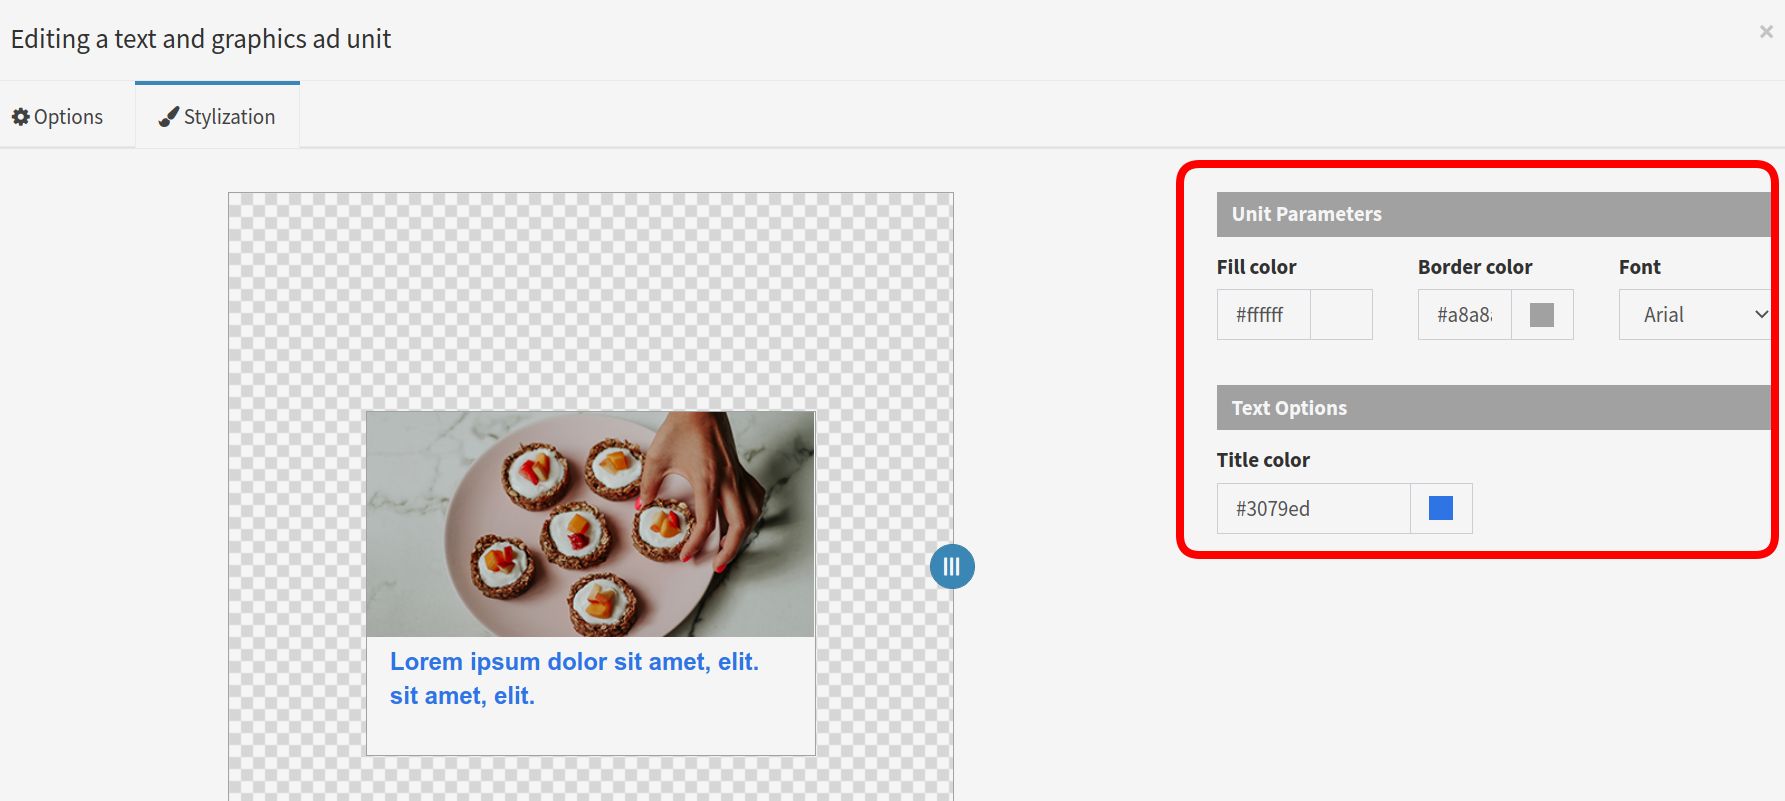
When you are satisfied, save the changes (“SAVE”) and the new look of the Ad block will become immediately active on your site!
These settings are individual per each Ad Block ( if you have more AdUnits you can tweak them individually ). This is how GoToNative Ads may look like – 3×1 means 3 ads in 1 row without borders and background text color …
… but you can create another Ad Block, which may look completely different, let’s say like this (3×2 – three ads horizontally in 2 rows in total 6 ads in Ad Block Unit, with text and background color and border around every Ad ):
It’s up to you how you wish Ad Block to look so it fits perfectly into your existing blog design.
Now is time to register and start earning money!
